Start Planning Your Rainwater Strategy

This page will guide you through four simple steps: map your roof in Google Maps, calculate how much rainwater lands on it, share photos of your property, and complete a short survey so we can design a rainwater system that manages water safely.

1 Map your roof
2 Calculate rainfall
3 Share photos
4 Complete survey

You don’t need perfect measurements or photos — we’ll refine everything with you during your consultation.

Your roof is a reservoir. These four steps show how to measure it and plan where the water can go.

Step 1: Map Your Roof in Google Maps

Even if you’ve never used Google Maps this way before, this quick roof check will give us a solid first estimate for your rainwater plan. You don’t need perfect accuracy — a simple outline of your main roof area is enough, and we’ll refine the details with you later.

If you get stuck at any point, just do your best and move on — your answers are meant to be quick approximations, not a final survey.

Use these screenshots to measure your roof area in Google Maps before you use the calculator.

Google Maps home screen with address entered
Go to maps.google.com, type your home address into the search bar, and press Enter.
Satellite view zoomed in on roof
Click the “Satellite” button on the map and zoom in until your roof fills most of the screen and the roof edges are clearly visible.
Right-click menu showing Measure distance
Right‑click on a corner of your roof and, in the menu that appears, select “Measure distance.”
Roof outline traced with area displayed
Click around the areas where your roof collects water to trace the outline. When you return to your starting point and click the first point again, Google Maps will show the roof area in square feet at the bottom of the screen.

Step 2: Use the Product Water Roof Rainfall Calculator

Enter your roof area and local rainfall to see how much rain lands on your roof each year.

Use the Product Water Rainfall Calculator below and enter:

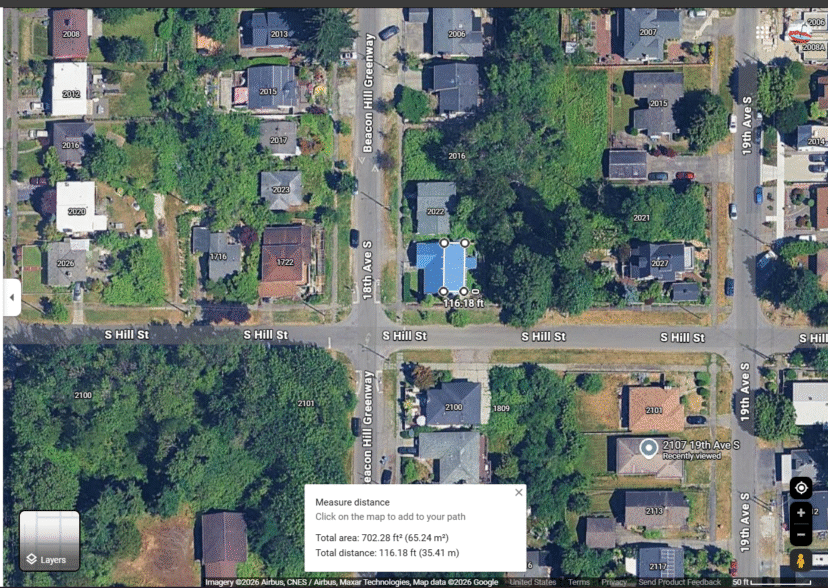
  • Your roof area (square feet)
  • Average annual rainfall (in inches)

If you’re in the Seattle region, you can use:

  • 36 inches per year
  • About 16 inches from April–October (spring through fall)
  • About 20 inches from November–March (winter months)

The calculator will show the total gallons of rainfall your roof receives each year.

This step is simply about understanding your available rainfall — not designing a system yet. Most homeowners are surprised at how much water their roof already collects, especially during the months when outdoor watering matters most.

Next, complete the short planning survey and upload a few photos so we can explore practical storage options for your property.

Think Outside the Tap: Roof Rainfall Calculator

Step 3: Help Us Understand Your Property

You’ve seen how much rain your roof receives. Now let’s look at where that water could work best on your property.

Complete the short planning survey and upload a few simple photos so we can understand your space and your goals. We’re not looking for technical details — just clear, everyday views that help us see what you’re seeing.

Helpful photos include:

  • A medium or wide view of your home and roof
  • A view of the side yard or other open areas
  • A view of the backyard
  • Any garden or landscape areas you’d like to support
  • A general view that shows how the house and yard connect

Phone photos are perfect. No measurements or special angles are needed.

There are more placement options than most homeowners expect. Storage can often be placed away from the downspout and positioned where it’s most useful on the property.

Once you submit the survey, we’ll review everything together and begin mapping out practical, manageable options that fit your space and goals.

Step 4: Complete Your Rainwater Strategy Survey

This short survey pulls together your roof rainfall, photos, and goals so we can come prepared to your consultation.

After completing the main questions in the survey, you can click through and skip the last three pages that appear after you press the Start button.